So ill go through setting up tanzu on vsphere 8 and deploying a couple of workloads, ill use my windows laptop to access it.
So these are the main guides I used.
Quick guide to getting started with tanzu – https://core.vmware.com/resource/vsphere-tanzu-quick-start-guide-v1a#_Toc53677530
Getting started with tanzu video – https://tanzu.vmware.com/content/videos/how-to-get-started-using-vsphere-with-tanzu-for-tanzu-basic-and-tanzu-standard
High-level steps
- Install windows subsystem for linux with ubuntu 20.04.4 LTS
- Deploy haproxy for my load balancing and get certificate
- Install VMware Tanzu cli and kubectl on my windows box
- Create storage policy for tanzu, check drs and HA are enabled, ensure vcls vms exist
- Deploy workload management in vSphere 8
- Create a namespace
- Deploy TKG cluster
- Deploy two workloads for testing
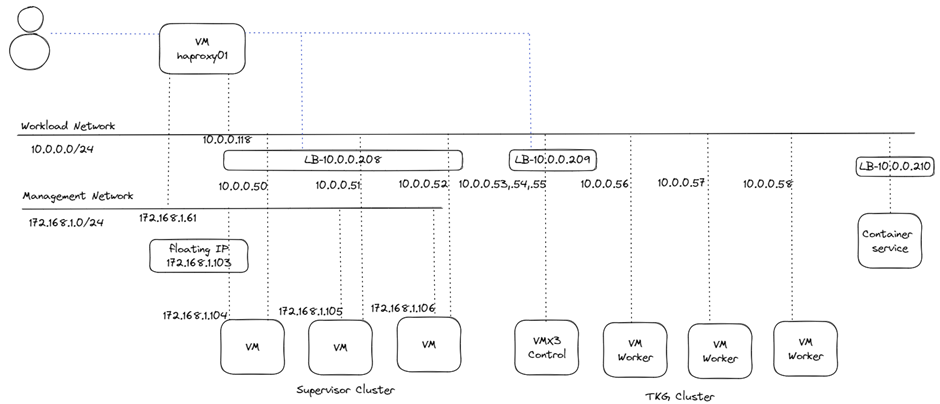
What my design looks like
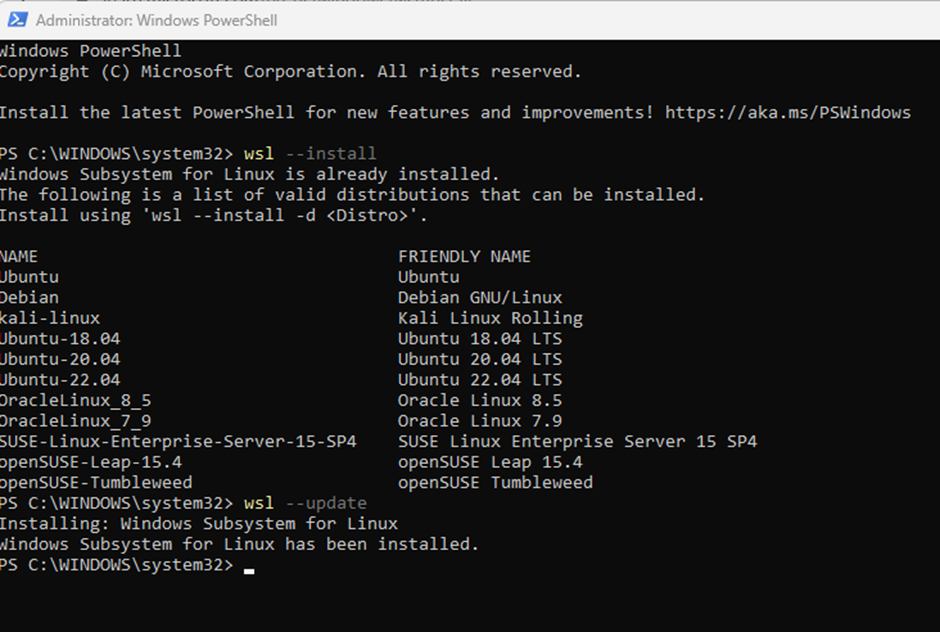
(1)Install windows subsystem for linux with ubuntu 20.04.4 LTS
You need the linux subsystem for windows to run linux commands.
Login to powershell as a administrator and type
wsl --install
wsl --update
(2)Deploy haproxy for my load balancing and get certificate
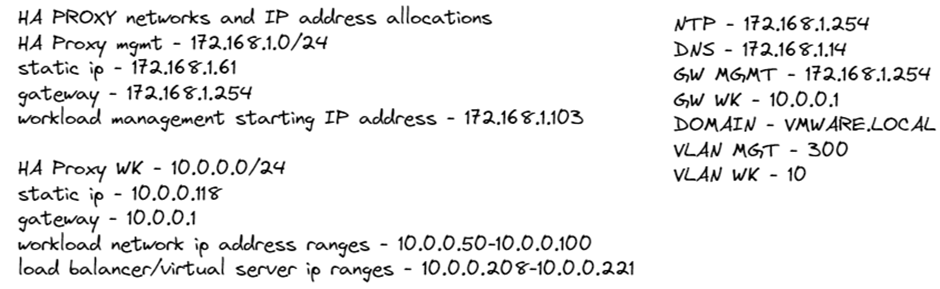
The haproxy is a front end to your Kubernetes, supervisor cluster and applications running in Kubernetes. You will need two networks one for management and one for workload
Download haproxy ova
https://github.com/haproxytech/vmware-haproxy

when deploying ensure haproxy has DNS and is all lower case and has a number in it.
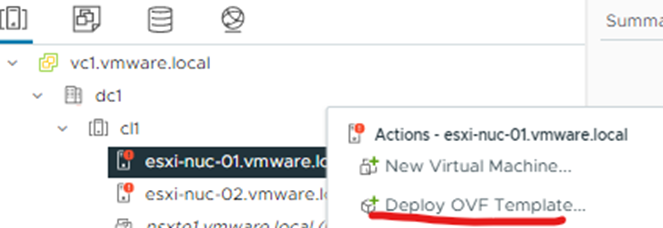
Right click your cluster or esxi host and click deploy OVF template
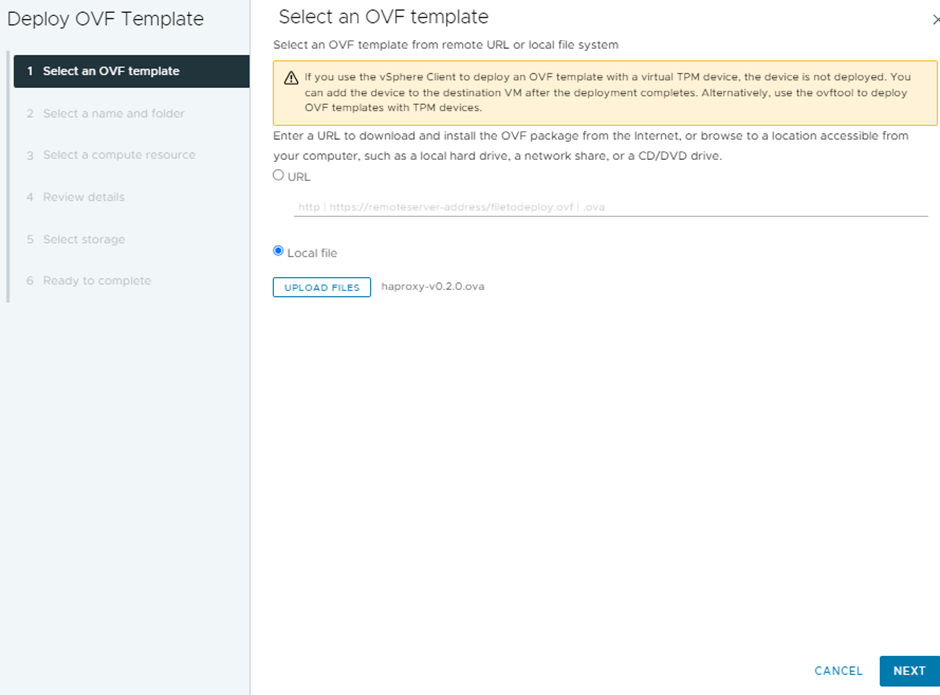
Click upload files, browse to the location of your haproxy.ova and click next
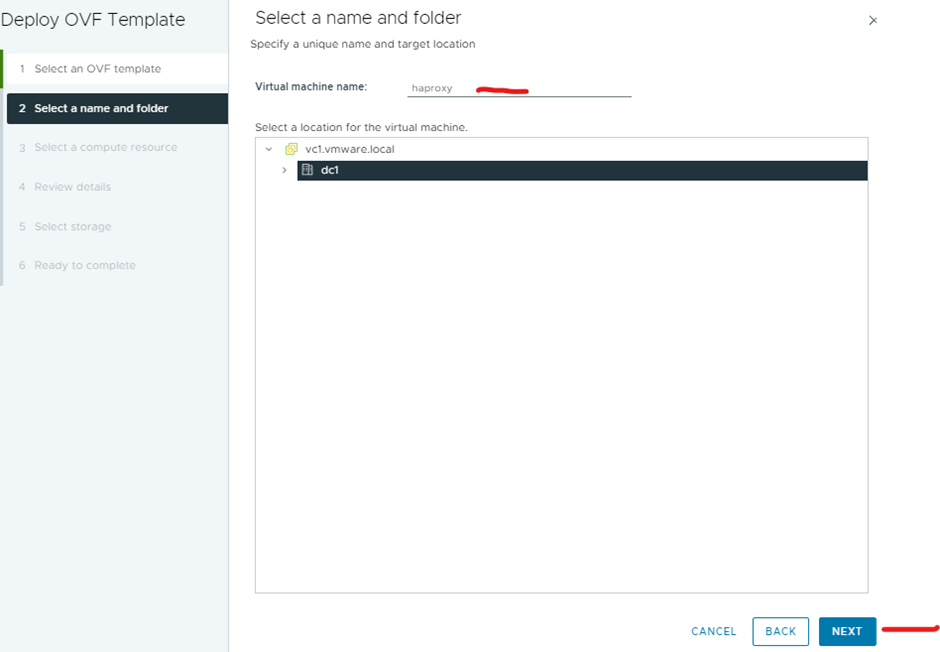
Type a name for your virtual machine and click next
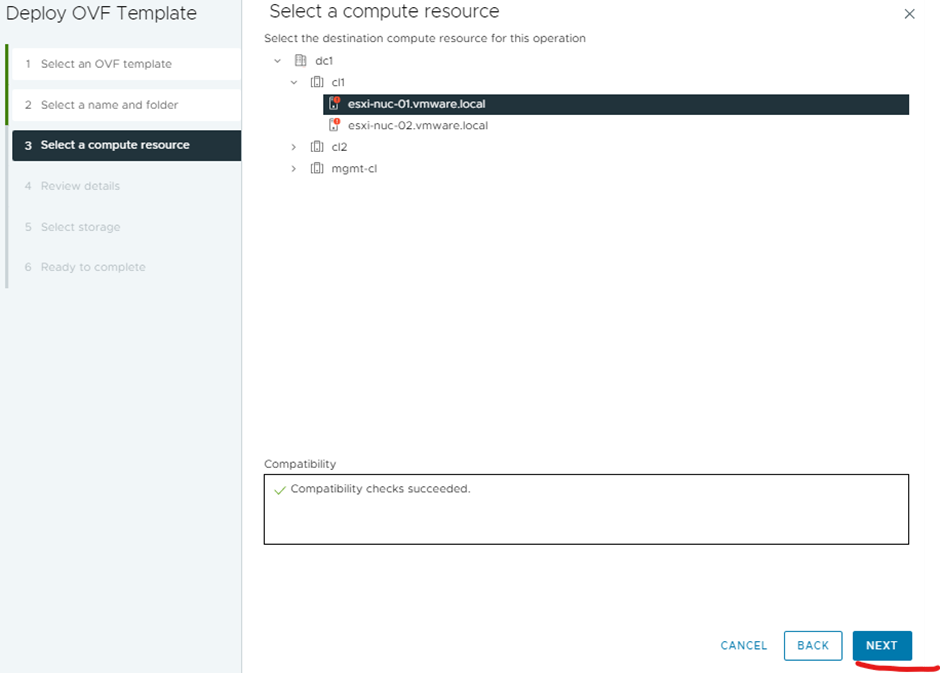
Select a compute location and click next
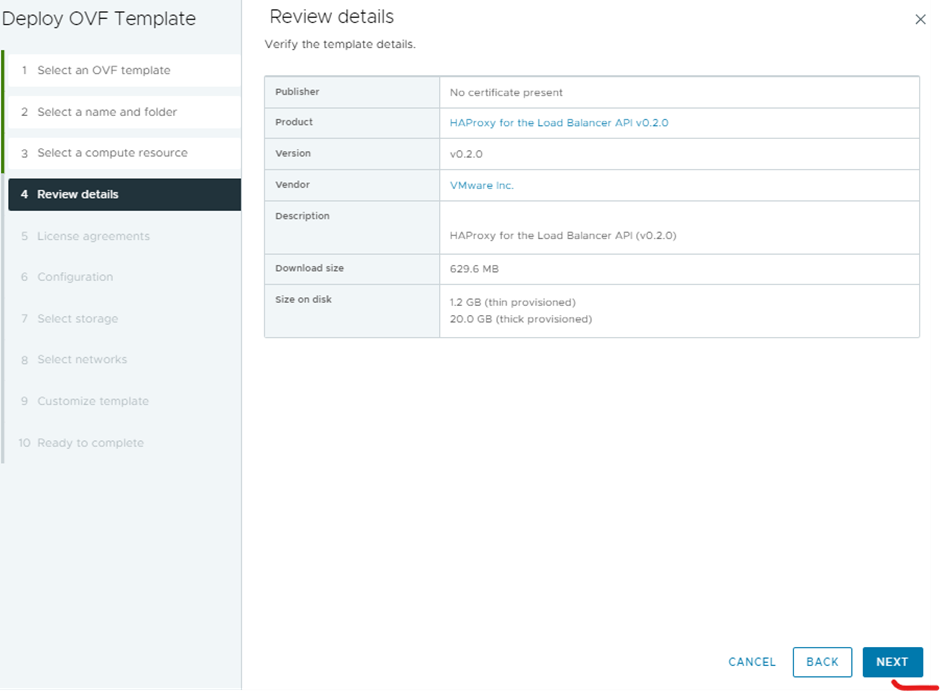
Click next on review details
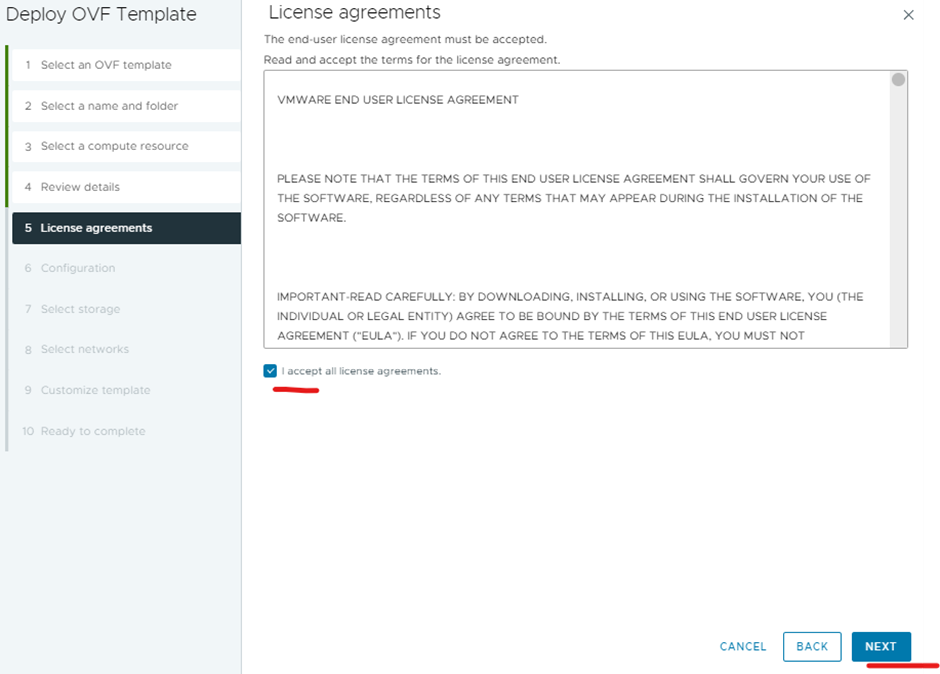
accept agreement and click next
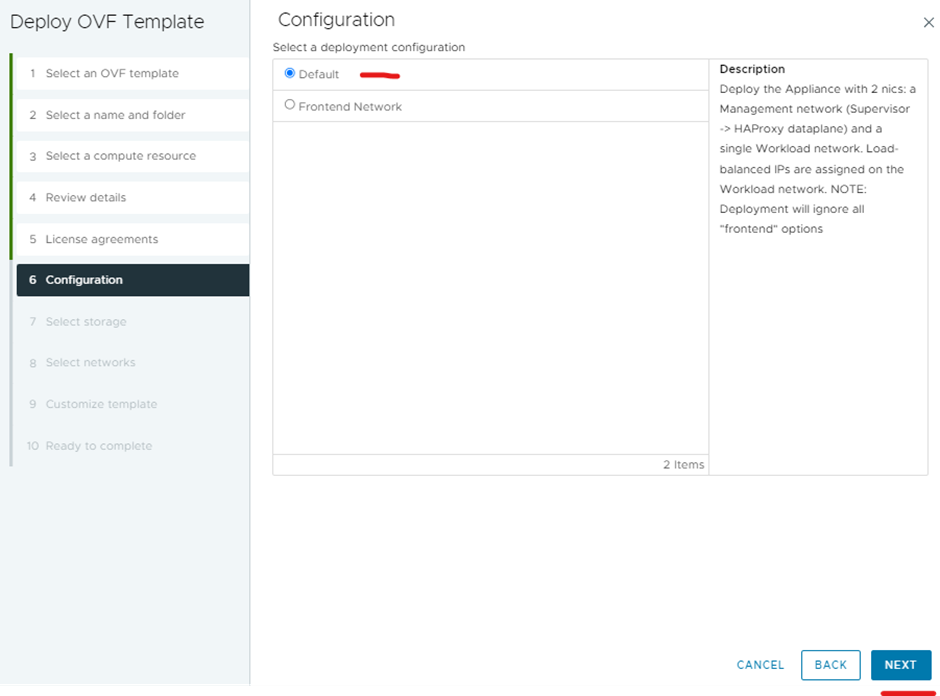
select default and click next
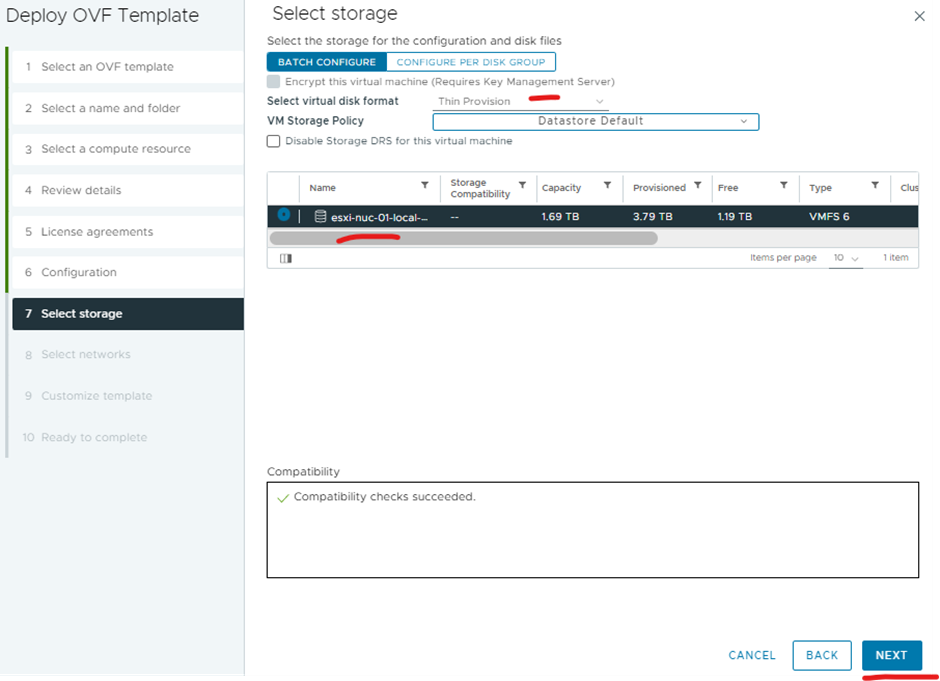
select your storage location and disk format and click next
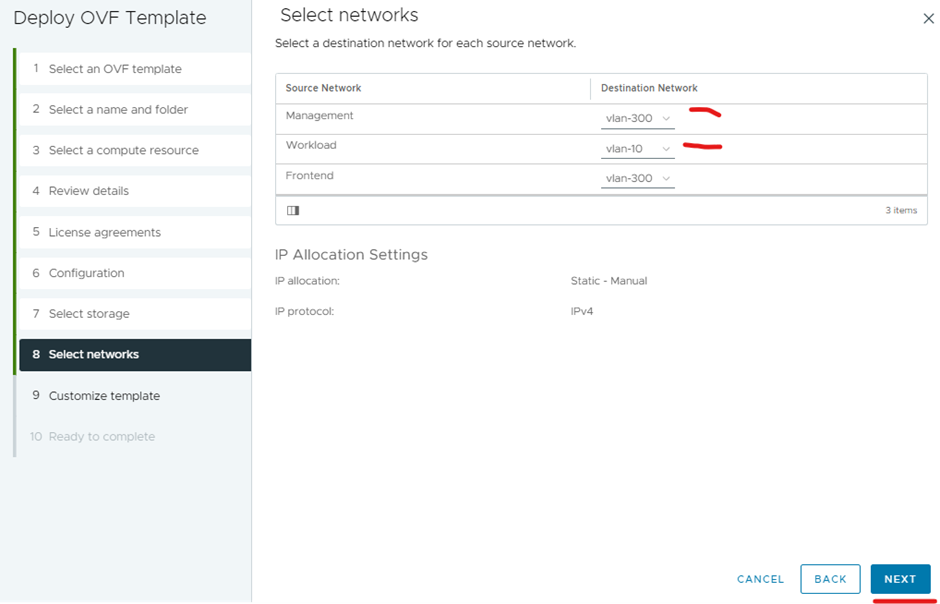
Select your management port group and workload port group and leave frontend as default and click next
Type in root creds and scroll down
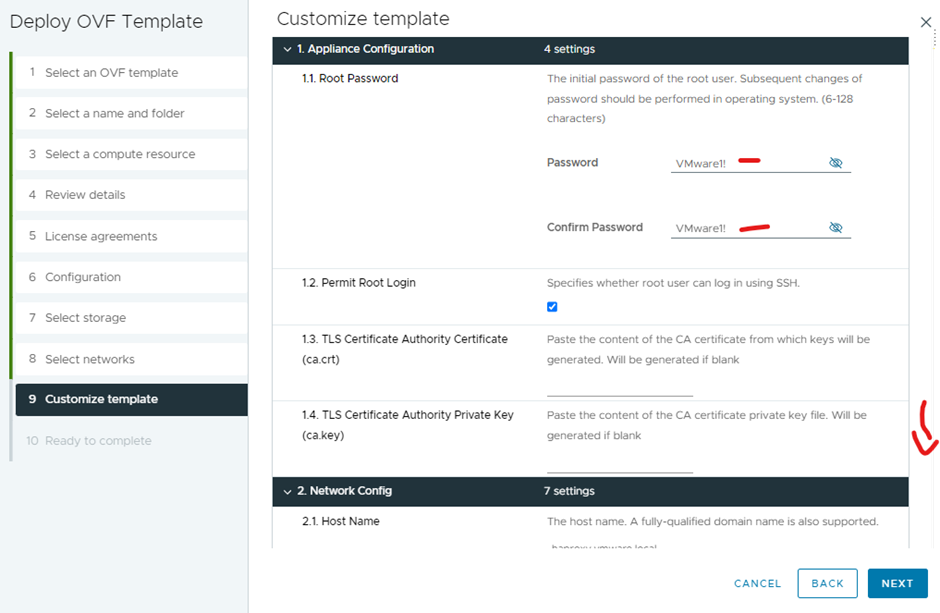
host name – haproxy01.vmware.local (the picture should be haproxy01.vmware.local I had to deploy it again after this)
DNS – 172.168.1.14
Management IP – 172.168.1.61
Management gw – 172.168.1.254
workload ip – 10.0.0.118/24
workload gateway – 10.0.0.1
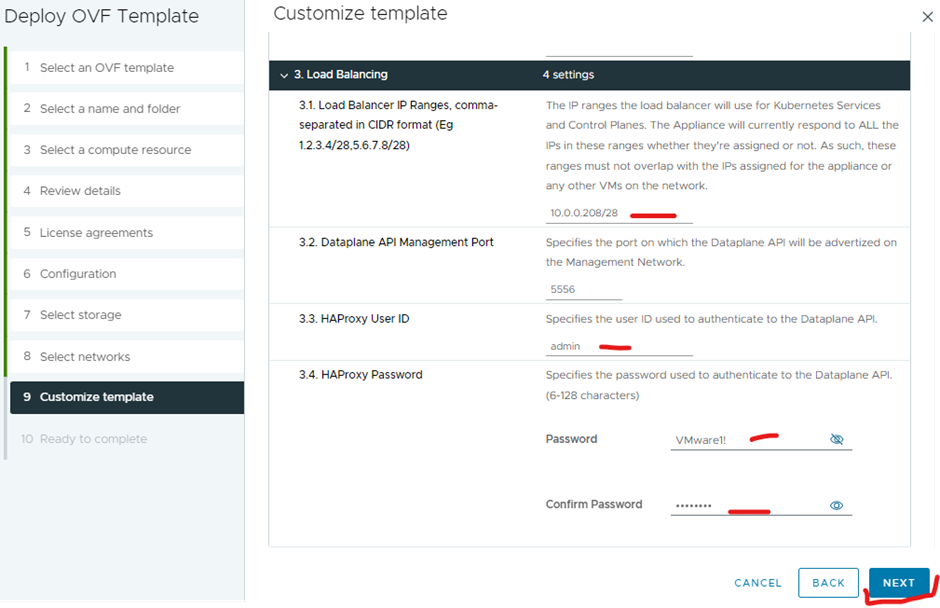
scroll down

Load balancer range – 10.0.0.208/28
Leave port as default
username – admin
password – VMware1!
Click next
Confirm settings and click finish
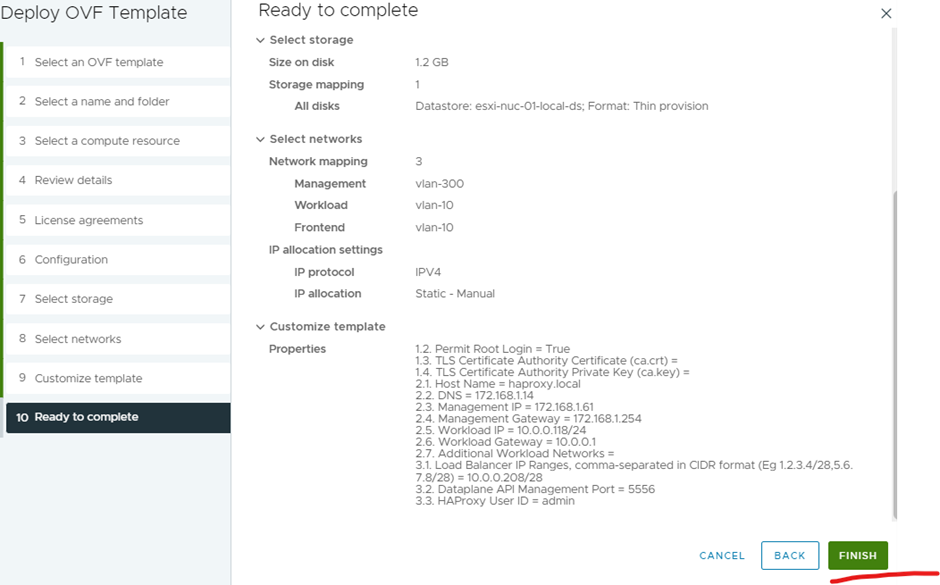
Power on once completed
Get certificate of haproxy
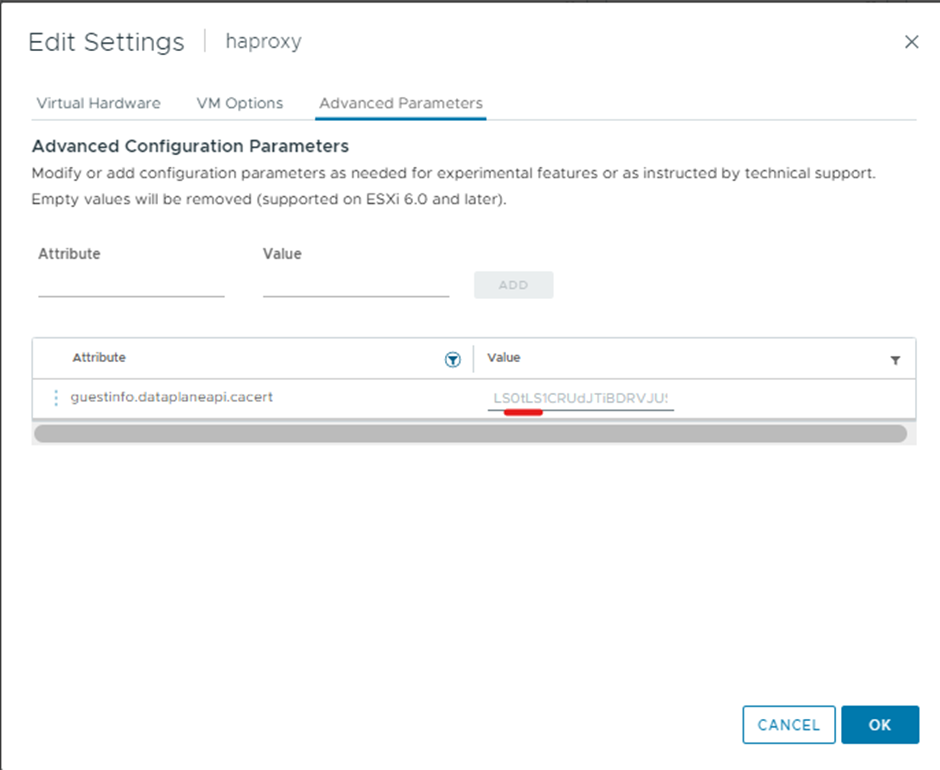
Right click haproxy vm in the vcenter inventory and click edit settings, click the advanced parameters tab, filter and look for ‘cert’
Copy the value
browse to – https://www.base64decode.org/
paste what you copied and click decode > save the decoded output, you will need this later
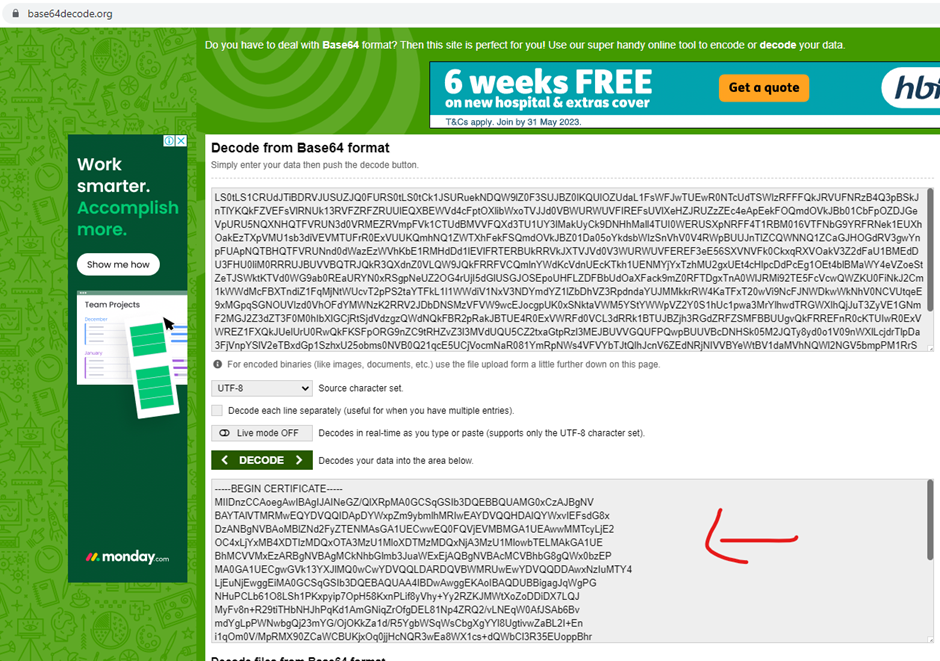
-----BEGIN CERTIFICATE-----
MIIDnzCCAoegAwIBAgIJAINeGZ/QlXRpMA0GCSqGSIb3DQEBBQUAMG0xCzAJBgNV
BAYTAlVTMRMwEQYDVQQIDApDYWxpZm9ybmlhMRIwEAYDVQQHDAlQYWxvIEFsdG8x
DzANBgNVBAoMBlZNd2FyZTENMAsGA1UECwwEQ0FQVjEVMBMGA1UEAwwMMTcyLjE2
OC4xLjYxMB4XDTIzMDQxOTA3MzU1MloXDTMzMDQxNjA3MzU1MlowbTELMAkGA1UE
BhMCVVMxEzARBgNVBAgMCkNhbGlmb3JuaWExEjAQBgNVBAcMCVBhbG8gQWx0bzEP
MA0GA1UECgwGVk13YXJlMQ0wCwYDVQQLDARDQVBWMRUwEwYDVQQDDAwxNzIuMTY4
LjEuNjEwggEiMA0GCSqGSIb3DQEBAQUAA4IBDwAwggEKAoIBAQDUBBigagJqWgPG
NHuPCLb61O8LSh1PKxpyip7OpH58KxnPLif8yVhy+Yy2RZKJMWtXoZoDDiDX7LQJ
MyFv8n+R29tiTHbNHJhPqKd1AmGNiqZrOfgDEL81Np4ZRQ2/vLNEqW0AfJSAb6Bv
mdYgLpPWNwbgQj23mYG/OjOKkZa1d/R5YgbWSqWsCbgXgYYl8UgtivwZaBL2I+En
i1qOm0V/MpRMX90ZCaWCBUKjxOq0jjHcNQR3wEa8WX1cs+dQWbCl3R35EUoppBhr
T+LR6KZUc9a+XYjUgf4KXTsZpks+bXpu4FYyaB2nOvrTMF6av0bvgwYOqt3HHmyF
4mJ7Uw83AgMBAAGjQjBAMA8GA1UdEwEB/wQFMAMBAf8wDgYDVR0PAQH/BAQDAgGG
MB0GA1UdDgQWBBTzU+SDpBAJHZNDogd/mDvogyw1WTANBgkqhkiG9w0BAQUFAAOC
AQEAp3GJM93bPO/2wJ5WOgYyKr7kNZCkqcVzXJUvy0qtjuK8qSnhnk45PtCmjpNT
5hrcZGO5bdi5k8TUXm2mBXIruzdGMF3HUPXykAWWZ1XMAiv4eynjO3TkH9/QoZO1
TvJMIG9y0fSul6NSvD2MBqsEpdKHVyz7dQejt6Norw4j9qZJPMkYEwthe7OMS29M
q3V98uWuQCWgvgQiVeup4f4ArGUnPPVDPFl4gTFmUIV1Zt8lk3Y4oCA5OBPIDHwo
Q/u4uZ6b+1C5h4krJEjWMkJzuOZXCEeVn+IPQtZGEeN6iX0Sz2jeIL07y823juDe
wKkyH6ElzU8EMEOg7rOQzYLdvA==
-----END CERTIFICATE-----
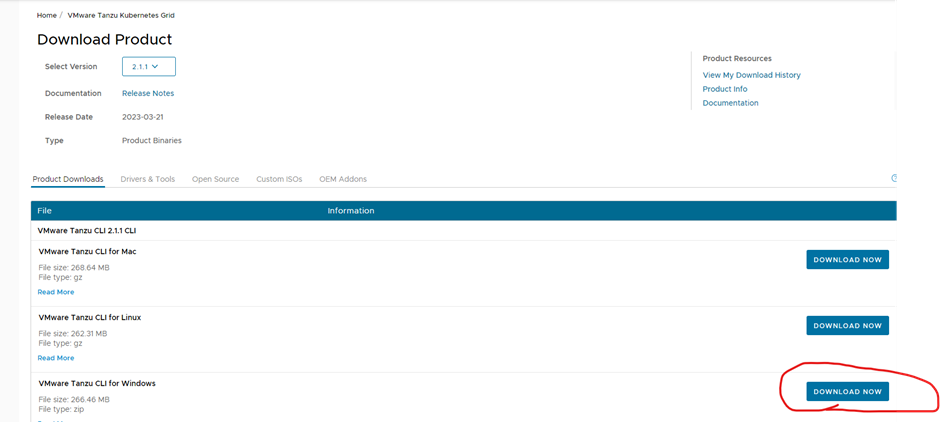
(3)Install VMware Tanzu cli and kubectl on my windows box
Download Tanzu cli for windows and kubectl for windows

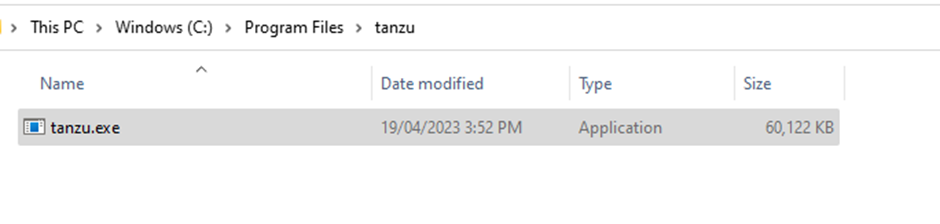
Create a tanzu folder in program files
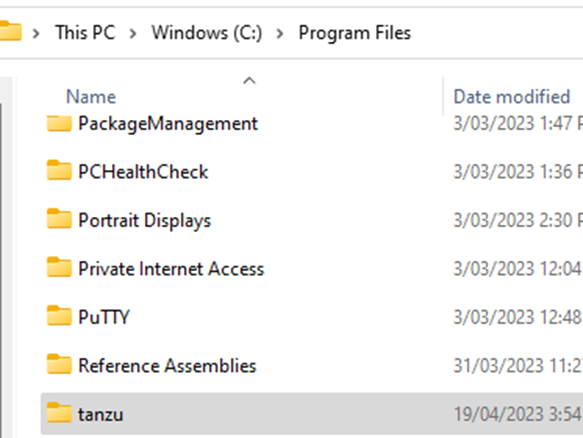
Extract the taznu cli folder and copy the tanzu-core-windows_amd64.exe to the newly created tanzu folder
My Path – C:\Users\username\Downloads\tanzu-cli-bundle-windows-amd64\cli\core\v0.28.1\tanzu-core-windows_amd64.exe

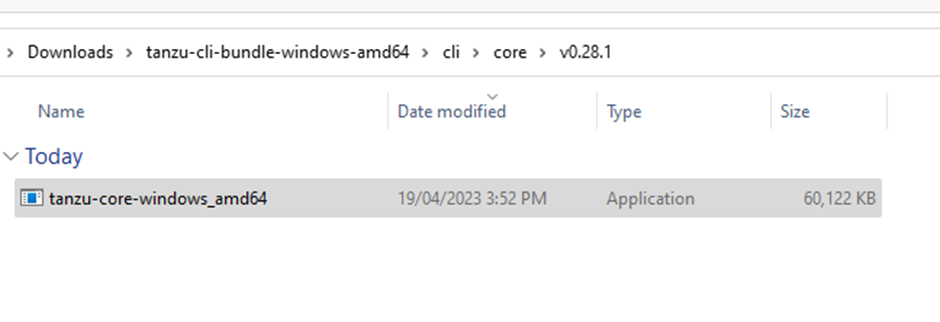
rename to tanzu.exe
Set permission for your user account on the folder
Right-click the tanzu folder, select Properties > Security, and make sure that your user account has the Full Control permission
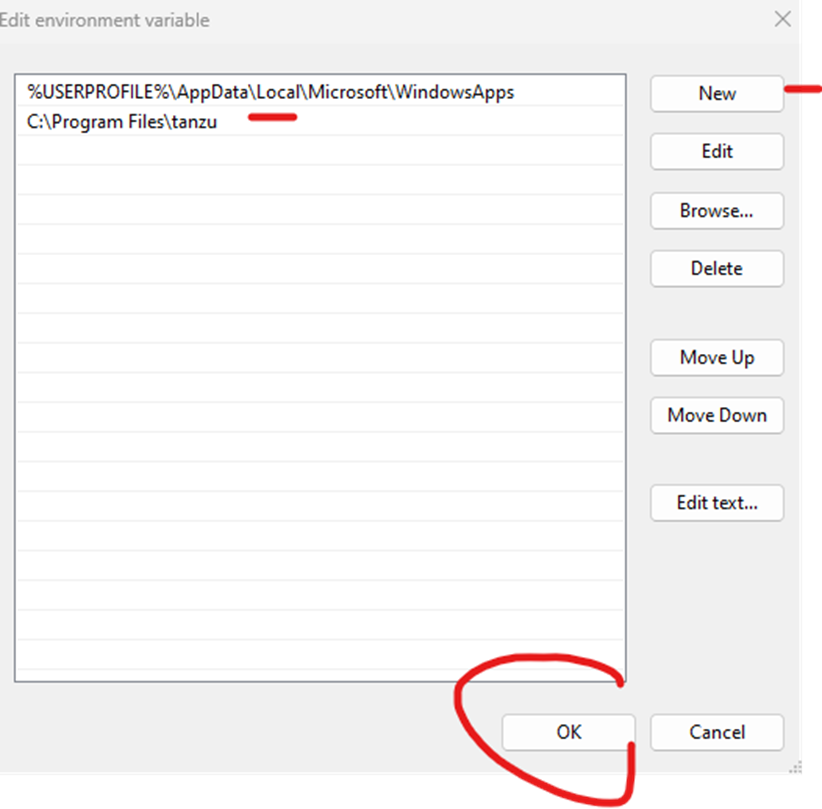
click your start bar and type in env > click edit system environment
Click advanced tab > click environment variables
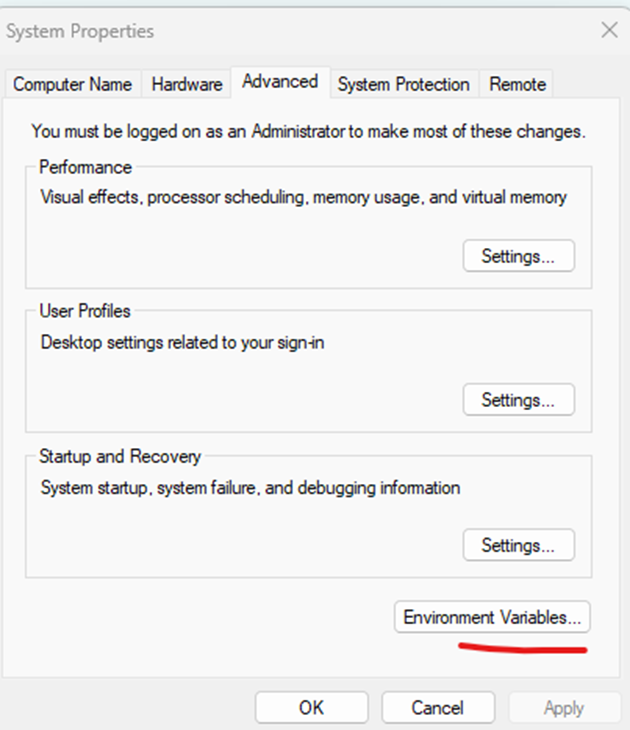
Click path and edit
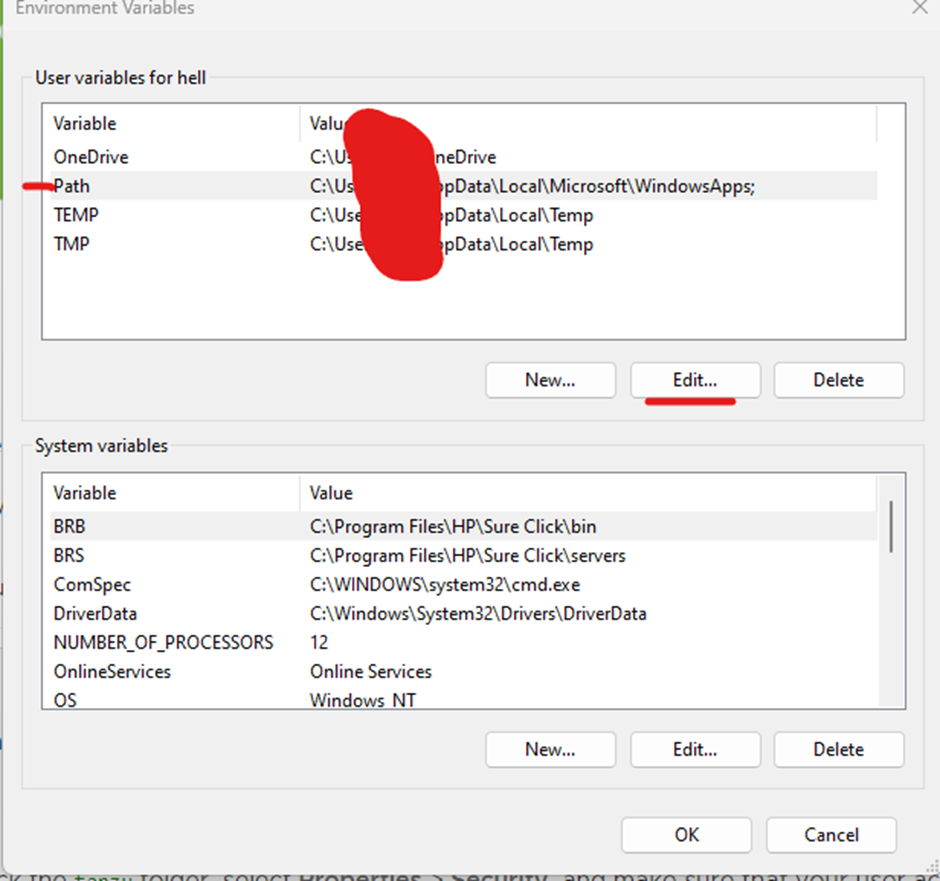
Click new and add c:\program files\tanzu and click ok, click ok
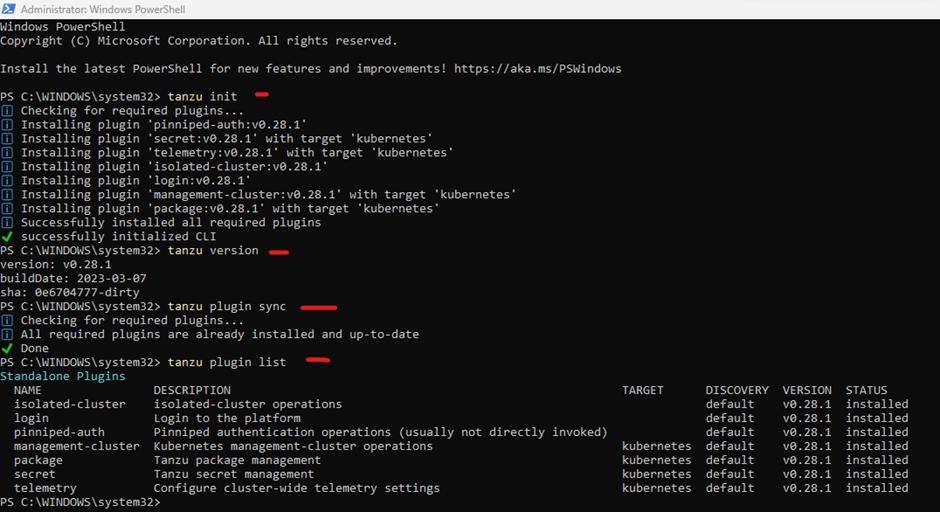
Open powershell as admin and test
Type
tanzu init
tanzu version
tanzu plugin sync
tanzu plugin list
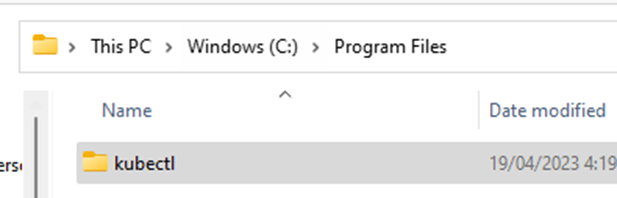
Create a kubectl folder in program files
Set permission for your user account on the folder
Right-click the kubectl folder, select Properties > Security, and make sure that your user account has the Full Control permission
extract kubectl to the kubectl folder you created – I used 7zip
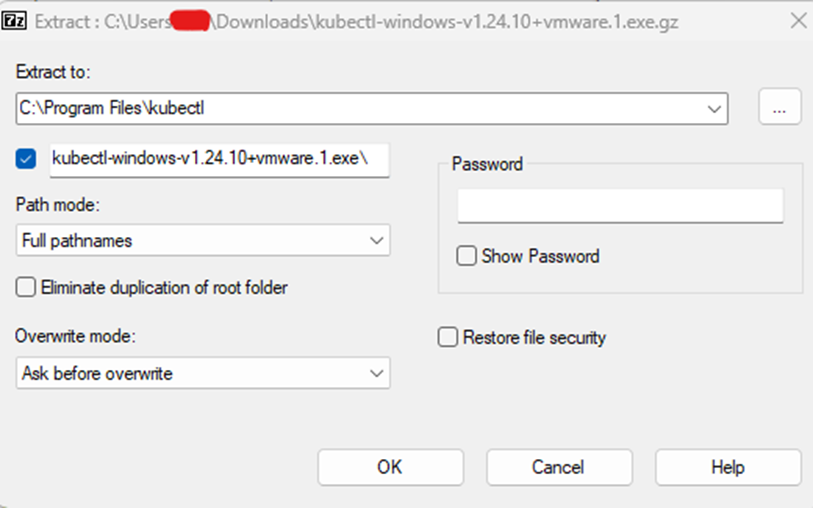
Rename the file in the kubectl folder to kubectl.exe
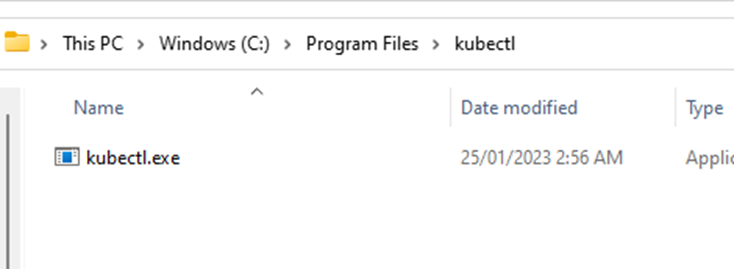
add the system environment for kubectl as well

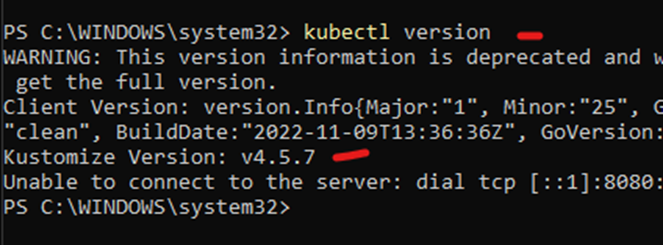
Open powershell as admin and test
type
kubectl version
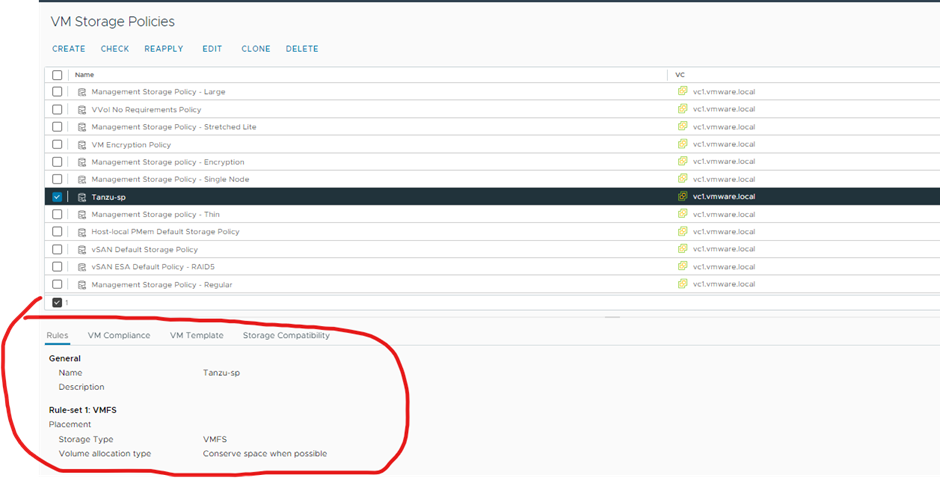
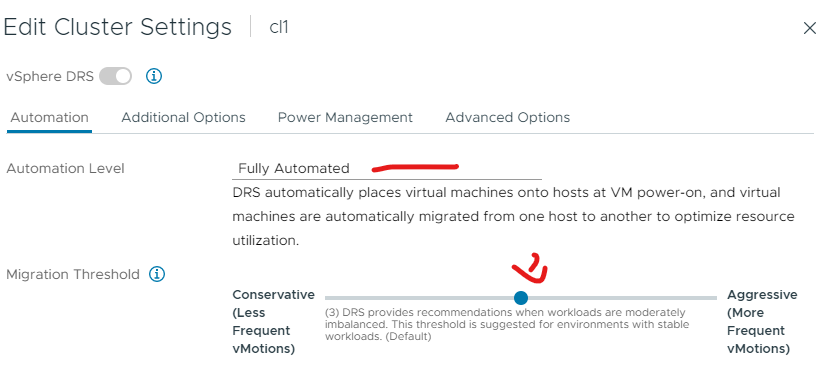
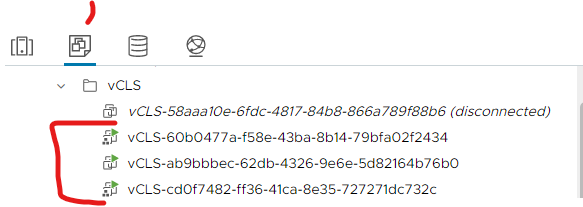
(4)Create storage policy for tanzu, check drs and HA are enabled, ensure vcls vms exist
My storage policy I created
My DRS settings
My HA settings

My vcls vms
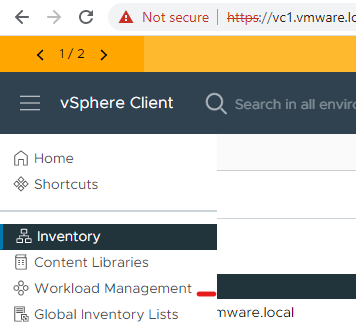
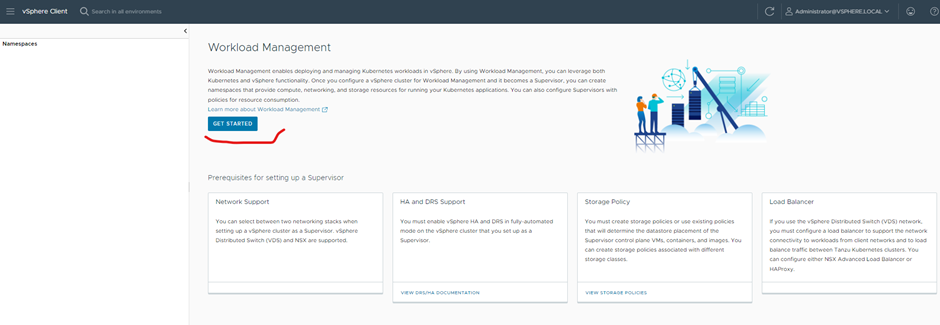
(5) Deploy workload management in vSphere 8
Open vcenter, click workload management from the menu
Click get started
Select your vCenter and vds and click next
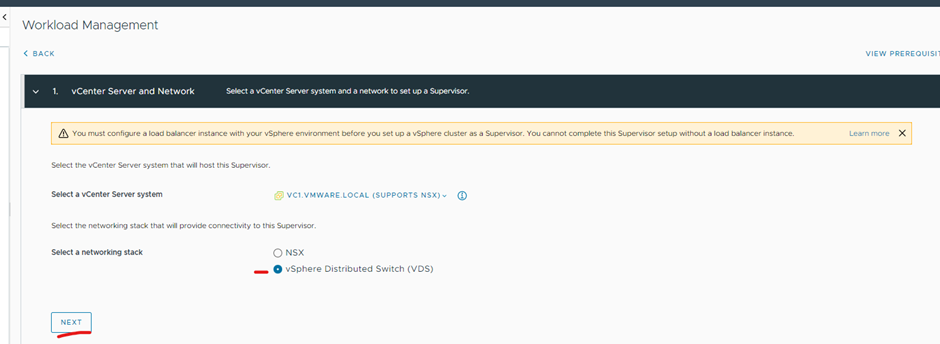
Type in a supervisor name – tanzu-cl01
Select cluster deployment tab
Select your cluster and click next
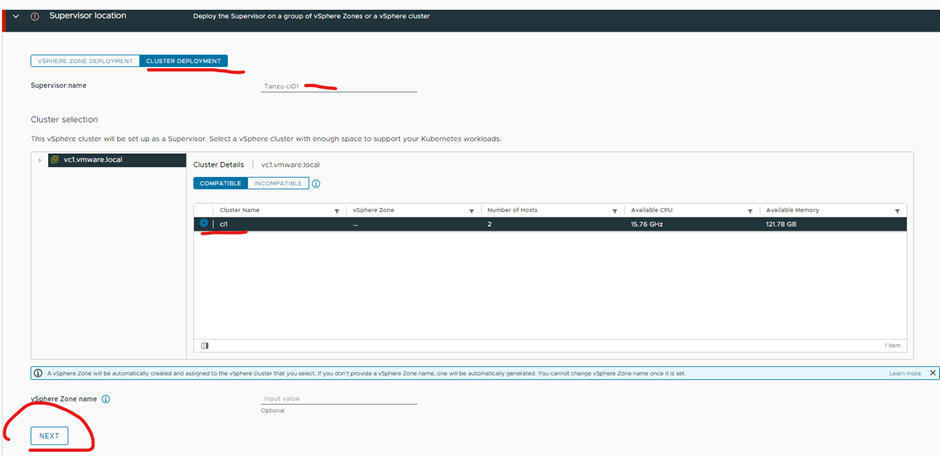
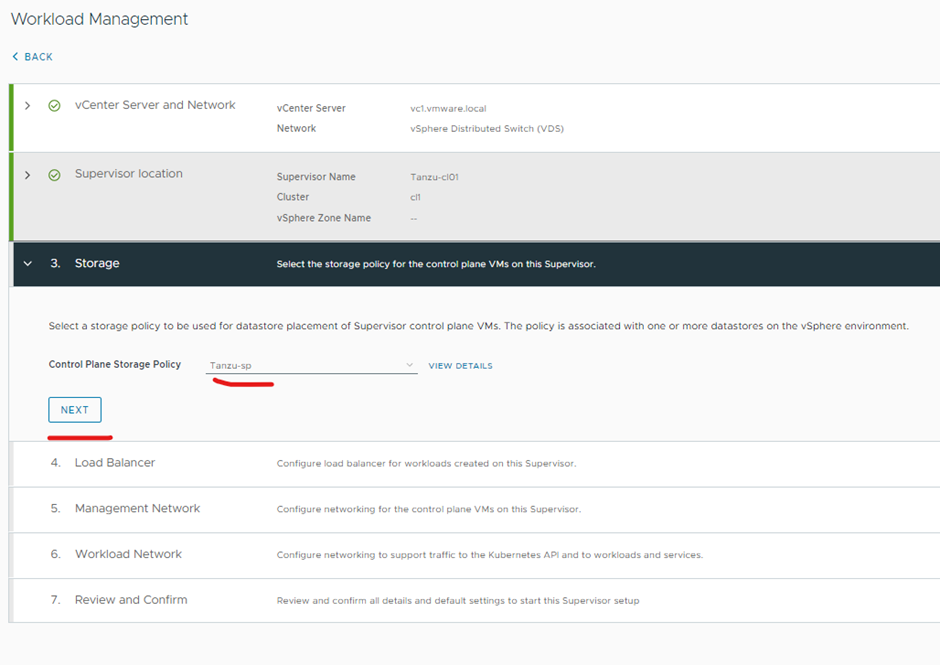
Select your storage policy you created and click next
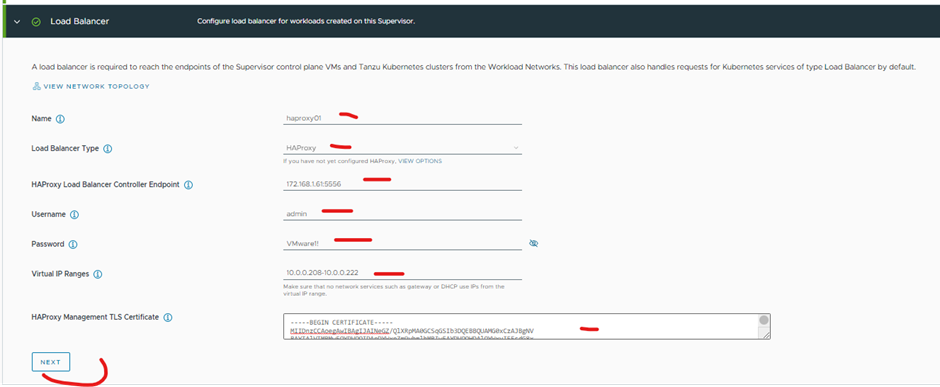
Type in your haproxy details
Name = haproxy01
load balancer type = haproxy
haproxy load balancer controller endpoint = 172.168.1.61:5556
Username name and password = admin, VMware1!
virtual ip ranges = 10.0.0.208-10.0.0.222
paste certificate you gathered from haproxy deployment
Click next
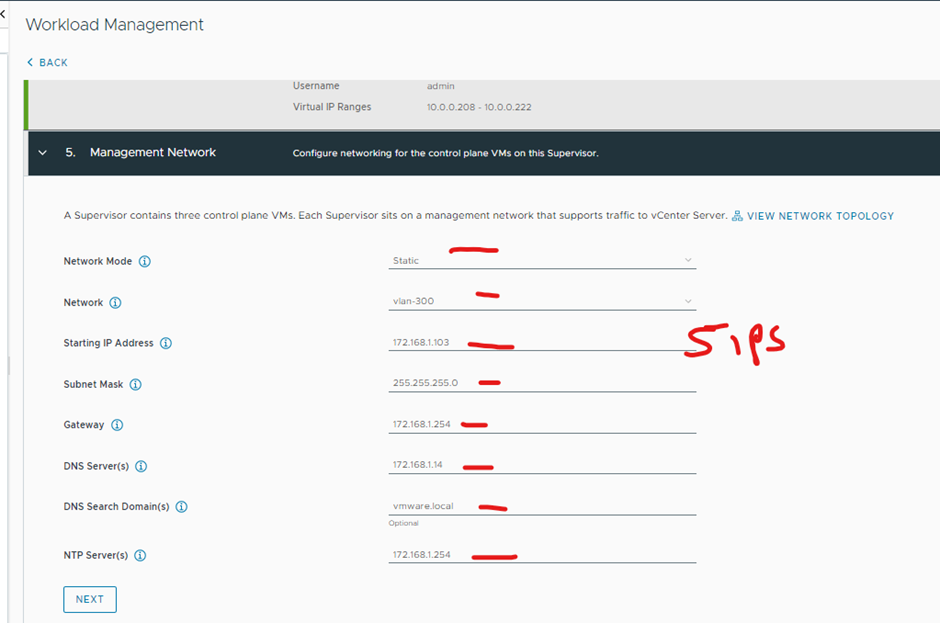
Network mode static
network is vlan-300
starting ip address 172.168.1.103
subnet mask 255.255.255.0
gateway 172.168.1.254
dns servers 172.168.1.14
dns search domain vmware.local
ntp servers 172.168.1.254
Click next
Workload network
network mode static
leave internal network for Kubernetes services as default
port group vlan-10
Leave network name as default
ip address ranges 10.0.0.50-10.0.0.100
subnet mask 255.255.255.0
gateway 10.0.0.1
dns server 172.168.1.14
ntp servers 172.168.1.254
click next

Change to tiny and click finish


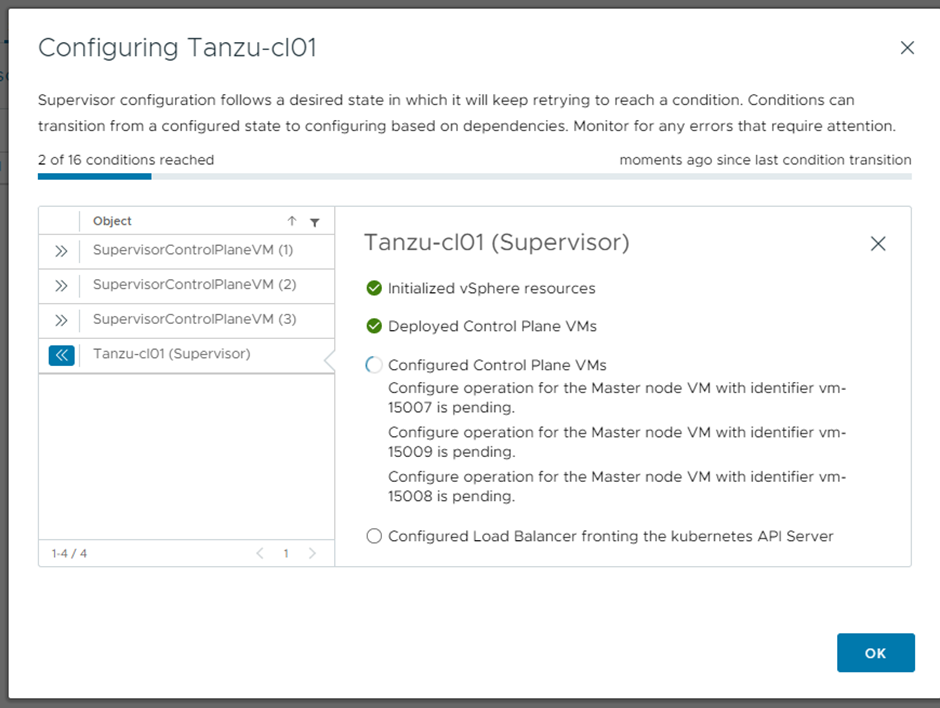
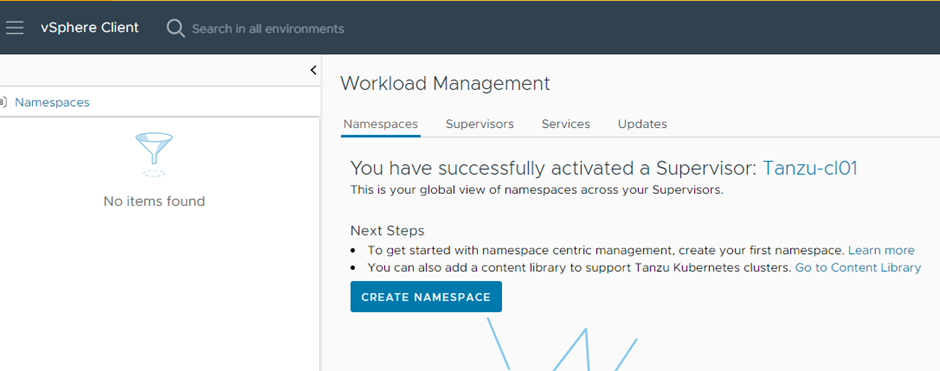
Ok deployed, the yellow mark is license (so make sure you have a valid license otherwise you have 60 days)

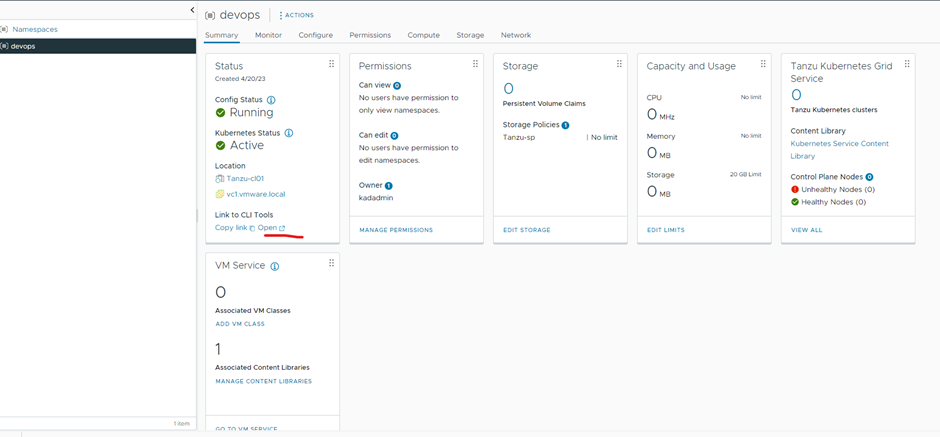
(6)Create a namespace
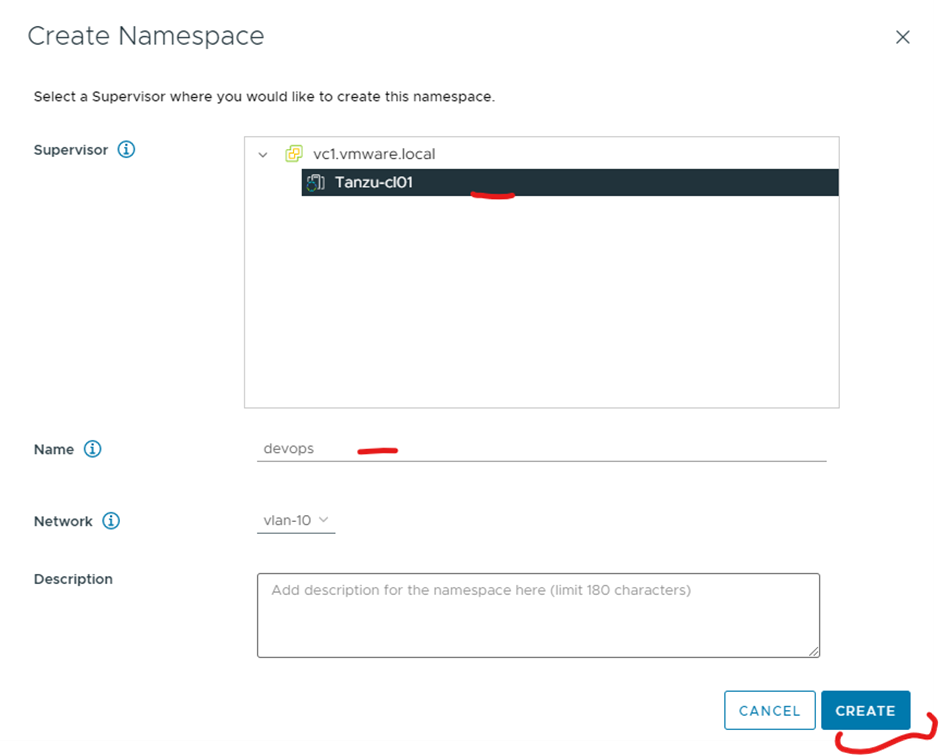
Click namespaces and click create namespace
Select the supervisor cluster to create the namespace in
Name – devops
Network – vlan-10
Description
Click create

Click devops
Put in permissions, storage policy, capacity and usage, add vm class and add content library.
For permission add administrator@vsphere.local for now as you will need to deploy a TKG cluster
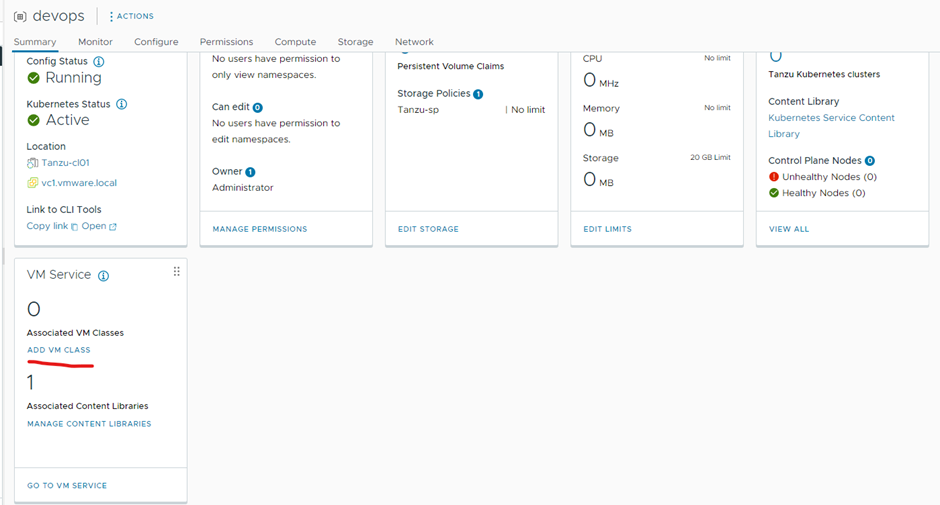
For vm class i just added guaranteed-xsmall

Now you will need the kubectl vSphere .exe, click the copy link
Click download cli plugin windows
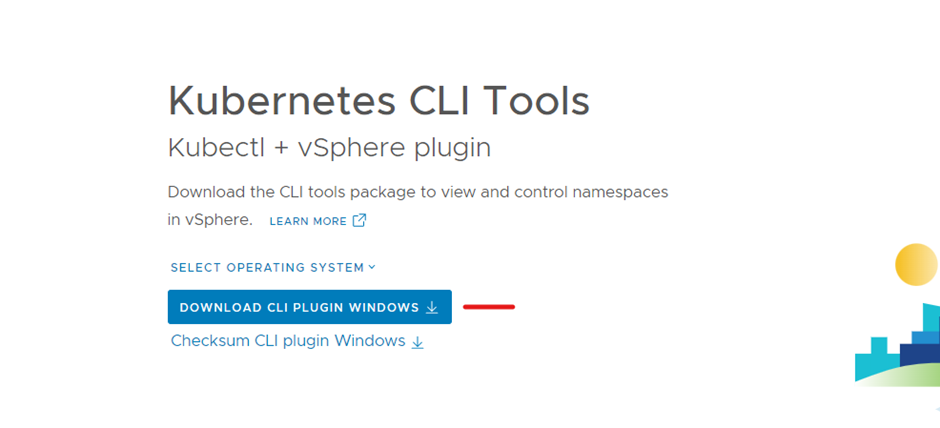
Copy extract kubectl-vsphere.exe to C:\Program Files\kubectl you created earlier
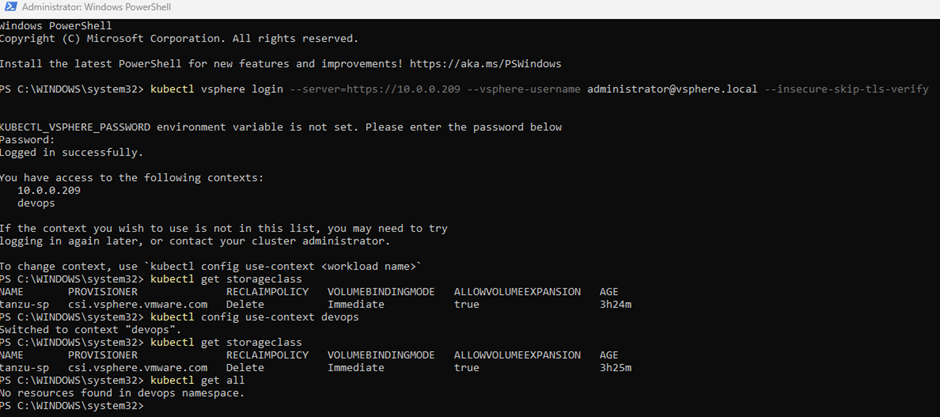
Test logging in works, open powershell as admin
kubectl vsphere login --server=https://10.0.0.209 --vsphere-username administrator@vsphere.local --insecure-skip-tls-verify
kubectl get storageclass
kubectl config use-context devops
kubectl get all
(7) Deploy TKG cluster
You will need to create a yaml file you can use the default one and modify it for your environment
Default yaml can be found below
default yaml file name – tkgs-cluster-1.yaml
apiVersion: run.tanzu.vmware.com/v1alpha2
kind: TanzuKubernetesCluster
metadata:
  name: tkgs-v2-cluster-default
  namespace: tkgs-cluster-ns
spec:
  topology:
    controlPlane:
      replicas: 3
      vmClass: guaranteed-medium
      storageClass: vwt-storage-policy
      tkr:
        reference:
          name: v1.21.2---vmware.1-tkg.1.ee25d55
    nodePools:
    - name: worker-nodepool-a1
      replicas: 3
      vmClass: guaranteed-large
      storageClass: vwt-storage-policy
      tkr:
        reference:
          name: v1.21.2---vmware.1-tkg.1.ee25d55
modified yaml file – tkgs-cluster-2.yaml (I have bolded what you need to change)
apiVersion: run.tanzu.vmware.com/v1alpha2
kind: TanzuKubernetesCluster
metadata:
  name: tanzu-cl01
  namespace: devops
spec:
  topology:
    controlPlane:
      replicas: 3
      vmClass: guaranteed-xsmall
      storageClass: tanzu-sp
      tkr:
        reference:
          name: v1.21.2---vmware.1-tkg.1.ee25d55
    nodePools:
    - name: worker-nodepool-a1
      replicas: 3
      vmClass: guaranteed-xsmall
      storageClass: tanzu-sp
      tkr:
        reference:
          name: v1.21.2---vmware.1-tkg.1.ee25d55
I saved it on my desktop
Open powershell as admin and go to the desktop path and type
kubectl apply -f tkgs-cluster-2.yaml
Check progresskubectl get tanzukubernetesclusters

Ready needs to be True

Login to your new tkg cluster
kubectl vsphere login --server=10.0.0.209 --tanzu-kubernetes-cluster-name tanzu-cl01 --tanzu-kubernetes-cluster-namespace devops --vsphere-username administrator@vsphere.local --insecure-skip-tls-verify

kubectl config use-context tanzu-cl01

(8) Deploy two workloads for testing
Deploy busybox and getshell
DON’T RUN IN PROD THIS COMMAND BYPASSES PRIVILEGES
kubectl create clusterrolebinding default-tkg-admin-privileged-binding --clusterrole=psp:vmware-system-privileged --group=system:authenticated
kubectl run -i --tty busybox --image=quay.io/quay/busybox --restart=Never -- sh
ping google.com
exit
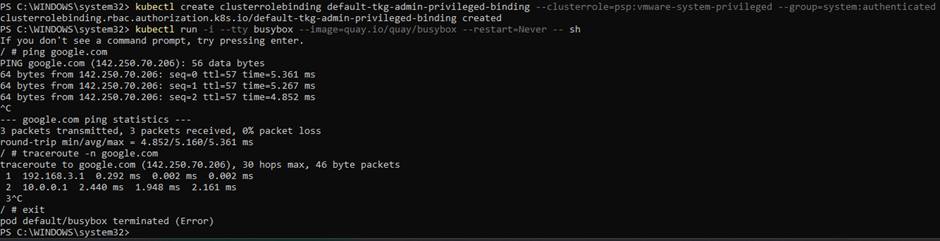
kubectl get pods

kubectl delete pod busybox

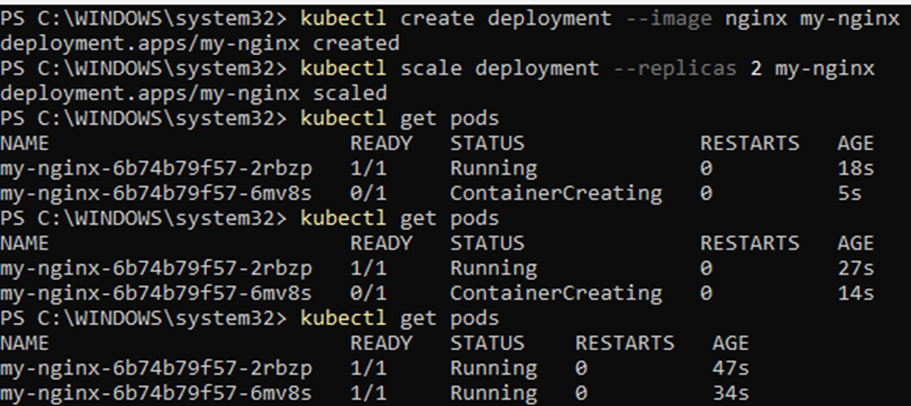
Deploy nginx and apply to loadbalancer
kubectl create deployment --image nginx my-nginx
kubectl scale deployment --replicas 2 my-nginx
kubectl get pods
kubectl expose deployment my-nginx --port=80 --type=LoadBalancer
kubectl get services
Use ip address to access from browser


Done for now enjoy
List of error messages