I was recently working with a customer who was looking for a design and deploy of a multi site NSX environment. The premise of the design was simple at it’s core. Create an deploy a system that contains two datacentres, and that can function in an active/active fashion. Whenever i talk to my colleagues about this design the same emphasis on having a deterministic path keeps coming up.
So with the deployment being completed, i thought it would be a great time to write about how we can use the BGP AS Prepend parameter to ensure that a multisite NSX deployment takes the shortest route to the core network every time creating a simple, deterministic network.
The Theory
BGP is at the heart of the internet and informs basically every router in the world how to communicate with one another. Within NSX we often see this used to communicate back to the physical network allowing use to automatically propagate the routing tables in the physical world with the overlay networks that we are running.
That in itself is perfectly fine but what happens when we want to have redundancy in our network? We are now exposed to multiple routes to the same destination. BGP in itself has a few built in parameters that we can use to ensure that traffic takes the correct route which is the purpose of this article.
BGP prepending is a technique used in the Border Gateway Protocol (BGP) to influence the routing decision of other BGP routers. It works by “artificially” increasing the length of the AS-path attribute of a route, which is a list of all the autonomous systems (ASes) that the route has traversed. BGP routers prefer routes with shorter AS-paths, so a prepended route will be less preferred than a non-prepended route.
BGP prepending can be used for a variety of purposes, including:
- To ensure that traffic for a particular destination always uses a specific path. This can be useful for load balancing or for ensuring that traffic for a critical application always takes the shortest path.
- To distribute traffic more evenly across multiple paths. This can be useful if there are multiple paths available to a destination, but some of the paths are more congested than others.
- To prevent loops in the routing table. BGP routers will not install a route in their routing table if the AS-path for the route contains a loop
The Lab
In this practical we will be looking at how we can use NSX T to extend the route of a secondary location to have it available as a secondary route in the event of a failover. The environment will be very simple to explain the purpose of how we can use AS Prepend to produce deterministic routes between our data centers.
Pre Requisite:
In order to follow along at home you will need the following setup prior to starting;
- A Core Router
- 2 vYOS routers connected to the core (one for each datacentre)
- Two Datacenters with vCenter & NSX Manager deployed to one of them
- A Functional NSX Overlay segment
- A NSX Edge with BGP peering configured
If that sounds daunting have a look around within the articles on this site There are a few great articles that can help you set this up
The lab topology which i will be working with can be seen below. In order to save on resources and make this slightly more tolerable in terms of performance i am going to only use the machines in the main site (Site A). In an actual deployment we would expect the second datacenter to have hosts and workloads running within it but as this is nested we need i’ll need to be slightly more resourceful.

If we have a look at the nested vCenter for this environment we can see exactly what’s above in DC1 with the bonus of having a few Tiny Linux VM’s for testing.

The way that the hosts are configured for this lab are relatively simple. Each host will have 4 uplinks. These uplinks will be split across the various services that are required for a simple datacentre.
- Uplink 1: This will carry vSAN/vMotion and Management Traffic
- Uplink 2: This will carry the Host TEP network as we are using separate VLAN for both edge and host TEPS
- Uplink 3: This will be used as our BGP Path A and Edge TEP network
- Uplink 4: This will be used as our BGP Path B and Edge TEP network
Note: This is by no means best practice when it comes to assigning uplinks but it does provide a simple means of understanding how to map uplinks.
With that being said our uplinks should look something like below

What we want to achieve in this lab is to allow for BGP to pragmatically choose which path all of the traffic will be taking for a given VM.
Now with the building blocks in place lets review and example of what we want to achive.
We have a collection of workloads that are running in DC1. While its great that we can send traffic through both DC1 through uplink 3 and DC2 through uplink 4. We want to have a deterministic way of ensuring that everything in DC1, is sent out of the vYOS router in DC1.
Assuming the core infrastructure is setup and NSX is ready to go lets have a review of the networks that are going to be in use for this lab.
| Description | VLAN | Address |
|---|---|---|
| BGP Peering Path A | 15 | 192.168.15.0/24 |
| BGP Peering Path B | 16 | 192.168.16.0/24 |
| Host TEP | 13 | 192.168.13.0/24 |
| Edge TEP | 14 | 192.168.14.0/24 |
| Test Overlay Segment | N/A | 172.16.10.1/24 |
This networking arrangement follows a very similar setup to any NSX deployment with a separate TEP VLAN for both the edges and hosts. The only difference is within our edge we will have two uplinks each dedicated to peering with a given neighbors in DC1 and DC2.
The NSX Configuration
In order to keep this article short we will just be touching on the following configuration items:
- NSX & vYOS BGP Configuration
- NSX Teaming
- Creating IP Prefix’s
- Creating Route Maps
- Applying the Route Maps and recording the results
1. We will start with confirming the teaming for our Uplink profile for the edge. The uplink profile defines which uplinks will be used to allow the edge to function. You’ll recall that in the design we will be using both Uplink-3 and Uplink-4 as separate uplinks so we can go ahead and configure this in System → Fabric → Profiles

Note: The default path does not matter as for our Interfaces we will always be assigning our segments to a path which we have defined (path-a or path-b)
Ensure that the names are recorded and save the profile.
2. Following this we can navigate to System → Fabric → Transport Zones and edit our existing VLAN transport zone. What we will be doing here is simply defining our teaming’s so we can use them when we edit our BGP Segments.

3. Following this we can navigate to our Segments and edit the two segments which were created for BGP Peering. Ensure that for Path A we are using the correct Path A Uplink (Uplink 3) and the correct Uplink for Path B (Uplink 4)

4. We can then push onto the vYOS BGP configuration. (Change IP’s where necessary for your deployment)
set protocols bgp system-as 65534 # Enable BGP

#Path A (vYOS A)
#Set NSX Neighbours (192.168.15.10 is the IP of the NSX Interface)
set protocols bgp neighbor 192.168.15.10 remote-as '65540'

#Alow vYOS to learn routes (10.12.14.61 is the IP of the vYOS Router)
set protocols bgp neighbor 192.168.15.10 update-source '10.12.14.61'

#Tell NSX about the routes vYOS knows
set protocols bgp neighbor 192.168.15.10 address-family ipv4-unicast route-map import 'setmet'
set protocols bgp neighbor 192.168.15.10 address-family ipv4-unicast soft-reconfiguration 'inbound'

#Propergate the default route to the edge
set protocols bgp address-family ipv4-unicast redistribute static

#Path B (vYOS B)
#Set NSX Neighbours
set protocols bgp neighbor 192.168.16.10 remote-as '65540'

#Allow vYOS to learn routes
set protocols bgp neighbor 192.168.16.10 update-source '10.12.14.62'

#Tell NSX about the routes vYOS knows
set protocols bgp neighbor 192.168.16.10 address-family ipv4-unicast route-map import 'setmet'
set protocols bgp neighbor 192.168.16.10 address-family ipv4-unicast soft-reconfiguration 'inbound'

#Propergate the default route to the edge
set protocols bgp address-family ipv4-unicast redistribute static
5. Now we can go ahead and enable our BGP Configuration in NSX. To achieve this we first want to create our interfaces on our T0 Service Router. This can be done via the T0→Interfaces menu. Fill in the details as follows
| Name | BGP Path A |
|---|---|
| Type | External |
| IP Address | 192.168.15.10/24 (BGP Path A VLAN setup on vYOS A) |
| Segment | BGP-Path-A |
| Edge Node | edge01.lab |
| Name | BGP Path B |
|---|---|
| Type | External |
| IP Address | 192.168.16.10/24 (BGP Path B VLAN setup on vYOS B) |
| Segment | BGP-Path-B |
| Edge Node | edge01.lab |

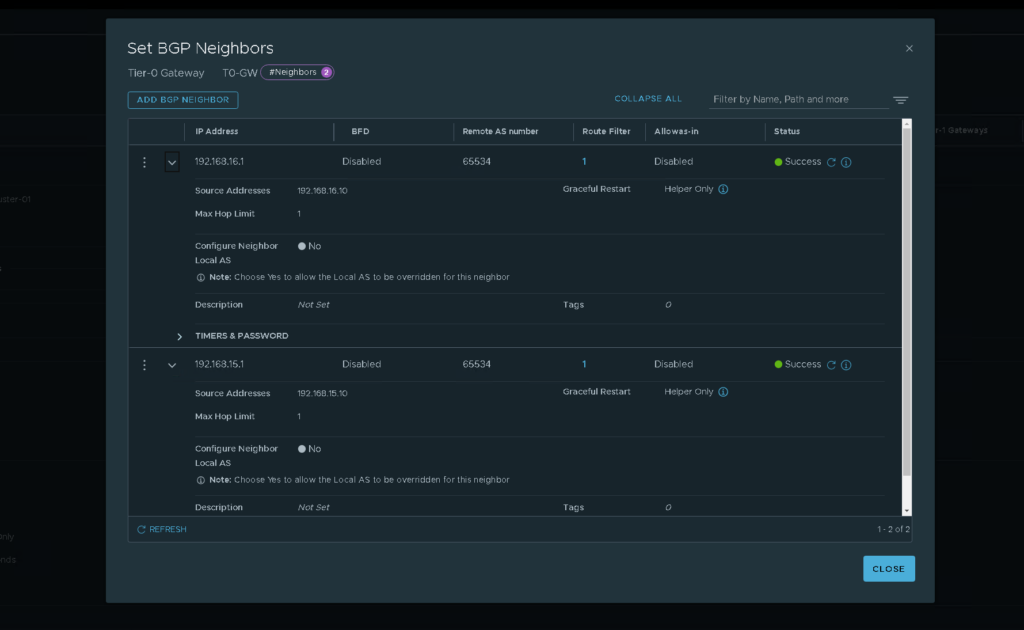
6. Now we can go ahead and create our BGP Neighbors. This can be done via the T0 Router and navigating to the BGP section before selecting “BGP Neighbors”. From here we can enter the BGP routes that we have created in vYOS.
6. Now when looking back at NSX we should be able to see our interfaces come online and show the established state. We can also see this through vYOS by issuing the get bgp neighbour xxx.xxx.xxx.xxx as seen below.


7. In order to test connectivity we can use a few methods. The first is using the NSX edge to confirm that the default routes have been propagated gated from the vYOS router down to the NSX Edge. Logging into the NSX edge and running get route on the T0 Service router we can see a number of routes being sent across.

8. Secondly we can use a test VM in the environment and connect it up to a segment. In this instance iv just created an overlay segment on 172.16.0.1/24 and connected a tiny Linux VM to it. From here we can ping the internet and see which route we are heading out of.

We can see here that we are using our Path A connection (192.168.15.1) to the outside world. This is what we want to happen as we have spun the test VM up in Site A. But as we have set no precedence or AS values this may not always be the case and its possible that on some occasions it may take a different path out of Path B.
To avoid this we can use IP Prefix’s and Route Mapping to basically make the second path much less desirable.
Prepending an AS Path Through Route Maps
1. Navigate to your T0 router and expand the routes section.
2. Select the IP Prefix option.
3. Create a new IP Prefix that will allow any connections. The reason that we create an IP Prefix first is that it allows us a single point of entry if we ever need to apply the route map to a different set of IP’s. In this instance we are just going to select anything and everything but this can be defined to only be relevant for specific networks if required.


4. Navigate back to your T0 and select the routes menu once again
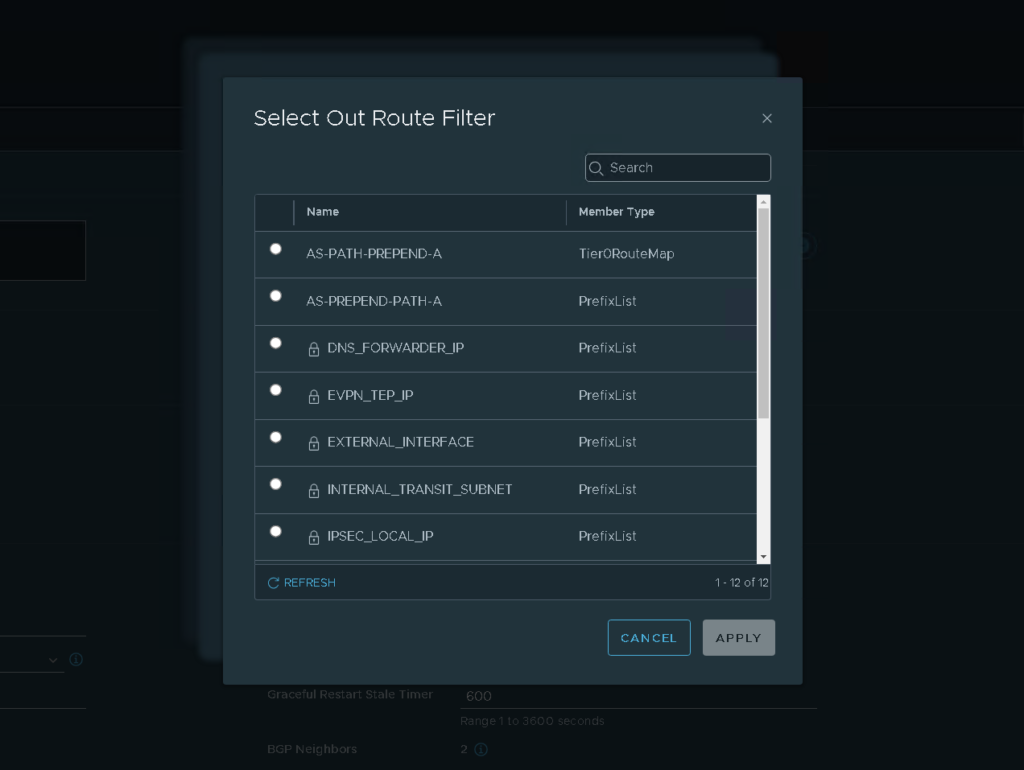
5. Select the Route Maps Option
6. Create a new route map with the following details


6. The last setting that we need to do is apply our route map to the BGP neighbour. This can be done via the T0→BGP → BGP Neighbours menu.
- Select Route Filter (1)
- Select Out Filter
- Select the T0 Route Filter created earlier
- Apply the filter


For this example i’m applying the extended route to Path A and this is because we have already seen that the test VM is currently heading through Path A. If we apply this route map to Path A we would be expecting the Test VM to head through path B.
7. Navigating back to the test VM is we run the traceroute once again we can see that we are now taking Path B (192.168.16.1) as it is the lower cost route.

8. When looking at the YOS router A we can see this change reflected via show ip bgp within the Path A TOR we can see that there is now a much longer path that is required to be taken.

9. If we run that same command over on the vYOS router in site B we can see that to get to the segment it is a much shorter distance and is therefore preferred.

That’s really all there is to it. Now we can ensure that we always know the path of a given network to save hours and hours of troubleshooting and optimization time. Hopefully this article has helped some of you guys out there in your own multi site designs.
Thanks for reading and until next time,
Nick